English
 Espaol
 Franais
 阿拉伯
阿拉伯 中文(簡)
中文(簡) Deutsch
 Italiano
 Português
 日本
日本 韓國
韓國 български
 hrvatski
 esky
esky Dansk
Dansk Nederlands
 suomi
suomi Ελληνικ
 印度
印度 norsk
norsk Polski
 Roman
Roman русский
 Svenska
帕金斯柴油發動機3012噴油器的談細參數與維修保養技術
帕金斯柴油發動機3012噴油器的談細參數與維修保養技術
Fuel injectors
燃料噴射器
1 Disconnect and remove the high-pressure pipes
1斷開并拆下高壓管道
and the spill pipes. For early engines, remove the
和泄漏管道。對于早期的發動機,刪除
relevant rocker box cover, operation 12-4. Release
相關搖臂箱蓋,操作12-4。釋放
the connection for the leak-off fuel from the fuel
燃油從燃油中泄漏的連接
injector and remove it through the wall of the rocker
噴油器并將其拆下搖臂的壁
box. For new engines, remove the relevant pedestal
箱。對于新發動機,拆下相關底座
rocker cover, operation 12-1.
搖桿蓋,操作12-1。
2 Release the cap screw of the clamp which retains
2松開保持夾持的蓋螺釘
the fuel injector and withdraw the injector. A fuel
噴油器和噴油器的噴射。燃料
injector which is tight in the cylinder head may be
在氣缸蓋上的噴油器可能是
released by the use of the slide hammer, 21825 849
使用滑動錘釋放,849 21825
(A1) and the adaptor, 21825 854 (A2).
(A1)和適配器,21825 854(A2)。
Caution: Ensure that the copper fuel injector sleeve
警告:確保銅燃油噴射套管
is not loosened in the cylinder head when the s lide
不松開氣缸蓋時的利得
hammer is used. If this occurs, refer to operation 12-
用錘子。如果發生這種情況,參考操作12—
1 Check that the sleeve of each injector is clean.
1檢查每個噴油器的套是否干凈。
2 If relevant, remove the connection for the leak-off
2如果有相關的話,刪除連接泄漏
fuel from eac h fuel injector and fit carefully each fuel
從每個噴油器的燃油和適合仔細每個燃料
injector into its s leeve, with the threaded hole for the
噴油器成的堤防,與螺紋孔的
leak-off fuel toward the outer wall of the rocker box.
向搖桿箱外壁泄漏燃料。
Caution: If a Bosch fuel injec tor is to be fitted to an
注意:如果一個博世噴油器是安裝在一個
early engine, instead of a CAV or an OMAP fuel
早期的引擎,而不是一個CAV或OMAP燃料
injector previously fitted, a new connection and a new
注射器先前安裝,一個新的連接和一個新的
washer for the leak-off fuel must also be fitted
泄漏燃油的墊圈也必須安裝
(assembly CV 17009/1).
(匯編1 / 17009)。
3 Fit the assembly of the metal cup and the rubber
3配合金屬杯和橡膠的裝配
seal against the head of each connection for the leak-
密封的每個連接的頭的泄漏—
off fuel and fit a new copper washer onto the thread.
燃油,并將一個新的銅墊圈安裝到螺紋上。
For early engines, insert each connection through
對于早期的發動機,插入每個連接通過
the openings in the outer walls of the rocker boxes
搖桿箱外壁上的開口
and fit the connection into its fuel injector, finger-tight.
并將其安裝到燃油噴射器中,將其擰緊。
4 Fit each injector with its clamp and put a spherical
4配合每一個噴油器,用它的鉗位,并把一個球
washer in its location in each clamp. Fit the cap
在每個夾具中的定位墊圈。安裝蓋
screws through the washers and clamps and tighten
通過墊圈和卡箍并擰緊
them to 60 Nm (42 lbf ft).
他們以60 nm(42磅英尺)。
5 For early engines, when all the cap screws of the
5為早期發動機,當所有的帽螺絲
clamps are tight, tighten the connections for leak-off
卡緊,擰緊連接泄漏
fuel to 27 Nm (20 lbf ft).
燃料27牛米(20磅英尺)。
6 Check that the joint face of each rocker box is
6檢查各搖桿箱的接頭面是否
clean. Fit a new joint for each rocker box cover and
清潔。為每個搖桿箱蓋安裝新接頭
align correctly the bolt holes.
正確對齊螺栓孔。
7 Fit a new ’O’ ring to the groove at the top of each
7在每一個頂部安裝一個新的'氧'環'
fuel injector. Fit carefully each rocker box cover. Fit
噴油器。小心地安裝每一個搖桿箱蓋。適合
the 8 bolts, with plain and spring washers, through the
8個螺栓,用平和彈簧墊圈,通過
bolt holes of each rocker box cover and tighten them
每個搖桿蓋的螺栓孔,并擰緊
to 27 Nm (20 lbf ft). For new engines, fit a new ’O’
27牛米(20磅英尺)。對于新引擎,適合新的“哦”
ring around the groove which is near the top of each
環附近的槽,這是附近的頂部
fuel injector and fit the pedestal rocker cover,
噴油器和安裝底座搖臂蓋,
operation 12-21.
操作12-21。
8 If other work is to be completed, fit temporarily a
8如果其他工作要完成,暫時不適合
cover or a plug to each of the open connections of the
蓋或插頭各開連接的
fuel injectors.
燃料噴射器。
9 For all engines, if relevant, remove the cover from
9對于所有發動機,如果相關,從
the outlet connection for leak-off fuel of each fuel
每種燃料的泄漏燃料的出口連接
injector. Put a new copper washer on each side of the
噴油器。在每邊上放一個新的銅墊圈
banjo connections and fit the pipes between the fuel
班卓琴的連接和配合,燃料管
injectors and the connection block for leak-off fuel.
噴油器和泄漏燃油的連接塊。
Tighten securely each banjo connection bolt and
擰緊各連接螺栓和班卓琴的安全
each union nut.
每個工會的堅果。
10 Remove the covers or the plugs from the inlets of
the fuel injectors and, if relevant, from the unions of
the delivery valves of the fuel injection pump.
11 Put each high-pressure fuel pipe between its
delivery valv e and its fuel injector. Ensure that eac h
pipe lies naturally between its connections. Tighten
by hand each nut on to its relevant union. DO NOT
bend or distort a pipe to make it fit between its
connections. Tighten securely each nut to 45 Nm (33
lbf ft).
Note: Identification of each high-pressure fuel pipe is
made by the cylinder number which is stamped on the
union nut that is fitted on the fuel injector.
12 Fit new rubber dampers around each high-
pressure fuel pipe. Put the shrouds over the rubber
dampers and retain securely each shroud to its
induction manifold with bolts and spring washers.
To dismantle
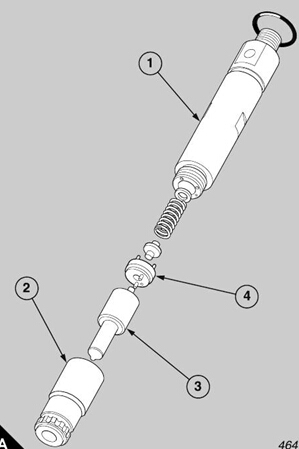
1 Hold lightly the body (A1) of the fuel injector in a
vice with soft covers and release the cap nut (A2).
Withdraw the assembly of the nozzle (A3), together
with the adaptor plate (A4), the valve seat, the valve
spring and the adjus tment shims. Keep together, in
their own tray, all the components of each injector.
Caution: Each nozzle needle is ground to the body
of its own noz zle and it is not interchangeable with
any other nozzle.
To assemble
1 Hold lightly the body of the injector in a vice and
insert the correct adjustment shims followed by the
valve spring and the seat. Fit the adaptor plate
around the seat.
2 If the nozzle and the noz zle needle are not
assembled, dip the components in clean ISO 4113
test oil and slide the valve fully into its location in the
nozzle. Fit the assembly to the adaptor plate and fit
the cap nut. Tighten the cap nut to 80 Nm (59 lbf ft).
3 For the fuel injec tors of early engines, fit the
connection for leak-off fuel, complete with a new
copper washer, into the body of the fuel injector. Do
not tighten fully the connection during this operation.
帕金斯柴油發動機噴油器清潔和檢查
噴嘴CVK 508清潔套裝
1 Wash the components of each injector in clean ISO
4113 test oil and dry with compressed air. Soak the
nozzle assembly in a carbon solvent such as ’Maxan
774’ which can be obtained from Henkel Chemicals
Limited, Edgeware Road, London.
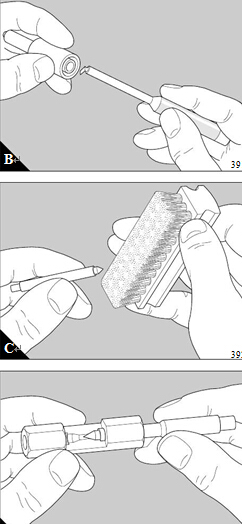
2 Use the cleaning kit CVK 508 (A,B,C,D and E) to
remove, from the nozzle and the nozzle needle, any
carbon which remains.
It is important that all carbon is removed from the
spray holes and that the correct size of wire from the
cleaning kit is used. The c ross-section of each wire
has a ’D’ shape and its size is measured across the
full diameter. Wires for the cleaning kit are available
in sets of five and can be supplied separately.
3 3 Fit the wire into its holder and ensure that the
protrusion is not more than 1,5 mm (0.0625 in). If the
protrusion is longer, there is a danger that the wire
may break in the hole. Insert the wire into each hole
and turn it to use it as a scraper, until the hole is clean.
Caution: Use only the tools supplied with the
cleaning kit to clean the assemblies of the nozzles. Do
not use any other device.
4 When all of the holes are clean, soak again each
nozzle in ’Maxan 774’, wash in clean water and dry
with compressed air and then dip in clean ISO 4113
test oil. If a device to flush the nozzles in a rev erse
direction is available, flush through each nozzle to
remove all particles that may still remain.
5 Use a magnifying lens to check the seats of each
5用放大鏡檢查每個座位的座位
nozzle needle for roughness, distortion, or other
噴嘴針的粗糙度,失真,或其他
damage. Check for worn holes in the nozzle and
損傷。檢查噴嘴內的磨損孔
check also the seat of each nozzle for damage.
檢查每個噴嘴的損壞位置。
Caution: If the faces of the nozzle needle or of the
警告:如果噴嘴針的面或
nozzle show signs that they have been affected by
噴嘴的跡象表明,他們已經受到影響
excessive temperature, both components must be
溫度過高,兩個部件都必須
renewed. DO NOT try to lap a nozzle needle to its
更新。不要試圖將噴嘴針到它的
seat as they do not have the same angles.
因為他們沒有相同的角度。
6 Dip the nozzle needle into clean ISO 4113 test oil
6將噴嘴針浸在4113個試驗油中
and insert it into the bore of its nozzle. Slide the
并將其插入其噴嘴孔中。滑動
nozzle needle fully into its location. Hold almost
噴嘴針完全進入它的位置。擁有近
vertical the nozzle and withdraw approximately one
垂直的噴嘴和撤回約1
third of the length of the nozzle needle from the
第三的噴嘴針的長度從
nozzle. When it is released, the weight of the nozzle
噴嘴。當它被釋放時,噴嘴的重量
needle should cause it to slide down on to its seat.
針應該使它滑到它的座位上。
7 If the nozzle needle is tight in the body of the
7如果噴嘴針在體內的
nozzle, it is permissible to lap the stem of the needle
噴嘴,它是允許的,以圈干的針
in the body of the nozzle. A special v ery smooth
在車身的噴嘴。一個特殊的非常光滑
compound is available for this purpose from the
化合物可用于此目的的
manufacturer of the fuel injectors.
燃油噴射器的制造商。
8 Inspect the faces between the body of the injector,
8檢查噴油器本體之間的面,
the adaptor plate and the nozzle for signs of scratc hes
適配器板和噴嘴的劃痕他標志
or of damage which could cause leakage under
或可能導致泄漏的損害
pressure.
壓力。
9 Check the shims for damage and inspect the valve
9檢查損壞的墊片和檢查閥
spring for distortion, damage or corrosion.
彈簧變形,損壞或腐蝕。
帕金斯柴油發動機噴油器的調整設置和測試
1 Use a test rig such as a ’Hartridge Injecta-centre’ to
1使用試驗臺如“哈特里奇注射液中心”
set the fuel injectors. Ensure that the container of the
設置噴油器。確保容器的
test rig is filled with clean ISO 4113 test oil. Loosen
試驗臺用潔凈的異4113試驗油。松開
the vent screw and operate the manual lever until the
排氣螺絲和操作手動桿,直到
flow of oil is free from bubbles. Tighten the vent screw
流動的石油是免費的泡沫。擰緊排氣螺釘
and continue to operate the manual lever until the oil
并繼續操作手動桿,直到油
which flows from the connection of the discharge side
從放電側的連接流
is also free from bubbles.
也沒有氣泡。
Warning! When an injector is tested, the nozzle
警告!當噴油器測試時,噴嘴
must be away from the operator because the oil which
必須遠離運營商,因為石油
is sprayed has enough force to pass through skin.
噴有足夠的力量通過皮膚。
2 Fit the connection of the discharge side of the test
2安裝在測試的放電側的連接
rig to the inlet of the injector and tighten securely.
鉆機到噴油器入口,并牢固地緊固。
Close the valve of the pressure gauge to prevent
關閉壓力表的閥門以防止
damage to the pressure gauge and operate rapidly
損壞壓力表和操作迅速
the manual pump to ex pel the air from the fuel
前像素從燃料空氣手動泵
injector. Open the valve of the pressure gauge one
噴油器。打開壓力表的閥門
quarter of a turn (90°), operate slowly the lever and
四分之一的轉(90),操作緩慢的杠桿和
make a note of the pressure at which the pointer of
作一個說明,在該壓力的指針
the pressure gauge moves suddenly to indicate that
壓力表突然移動以指示
the nozzle needle has opened. Unless other
噴嘴針已打開。除非其他
information is given, the press ure should be 243 bar
信息是給定的,壓力應該是243吧
(240 atmospheres) ± 5 bar.
(240個大氣壓)5巴。
3 If the pressure of the injection is incorrect, the fuel
3如果注射的壓力不正確,燃料
injector must be dismantled and the shims must be
噴油器必須拆除墊片必須
suitably adjusted. To increase the pressure, fit extra
適當調整。增加壓力,配合額外
shims; to reduce the pressure, remove some shims.
墊片;減少壓力,消除一些墊片。
4 When the correct setting is obtained, dry the tip of
4當正確設置時,干燥
the nozzle and operate the pump slowly to raise the
噴嘴和泵運轉緩慢地提高
pressure until the pointer of the pressure gauge
壓力,直到壓力表的指針
indicates 223 bar (220 atmospheres). Keep this
指示223欄(220個大氣壓)。保持這
pressure for 10 seconds and then inspect the tip of
壓力為10秒,然后檢查的尖端
the nozzle; a damp tip is acceptable but there should
噴嘴;潮濕的頂端是可以接受的,但應該有
be no drops of oil.
無油滴。
Caution: Do not overtighten the cap of the nozzle to
注意:不要過緊的噴嘴帽
try to correc t a leakage.
要正確的泄漏。
5 To test for leakage with a back pressure, operate
the pump and raise slowly the pressure until the
pointer of the pressure gauge indicates 233 bar (230
the time that elapses for the pressure to reduce
naturally to 152 bar (150 atmospheres). If the time is
less than six seconds the nozzle assembly must be
discarded. Continue to refer to the pressure gauge
and make a note of the time that elapses for the
pressure gauge to indicate 101 bar (100
atmospheres). The time must not be less than 45
Before a nozzle ass embly is discarded, ensure that
the leakage is not caused by carbon or dirt on the
faces, and if there are a high number of failures,
check that the fault is not within the test rig. At regular
intervals, according to the amount of use, the filter
element of the test rig must be renewed and, if
necessary, fill the container of the test rig with new
test oil. It is recommended that the equipment is
checked for accuracy at intervals of not more than two
years.
6 To check the atomisation, close the valve of the
pressure gauge and operate the lever at a rate of
approximately two strokes during each second.
Check that there is complete atomisation of the oil
which sprays from each hole in the nozzle and that
the quantities of the oil from each of the holes are the
same. The nozzle tip should be dry after the oil has
been sprayed.
7 After the tests have been completed and the fuel
injectors are acceptable, dry the fuel injectors and fit
caps to protect the nozzles, the inlets and the
connections for the leak-off fuel. Put the fuel injectors
in a dry, warm place until they are needed.
400-100-8969???15088860848
0574-26871589? 15267810868
0574-26886646? 15706865167
0574-26871569 18658287286